
햄발
Thread 본문
Thread
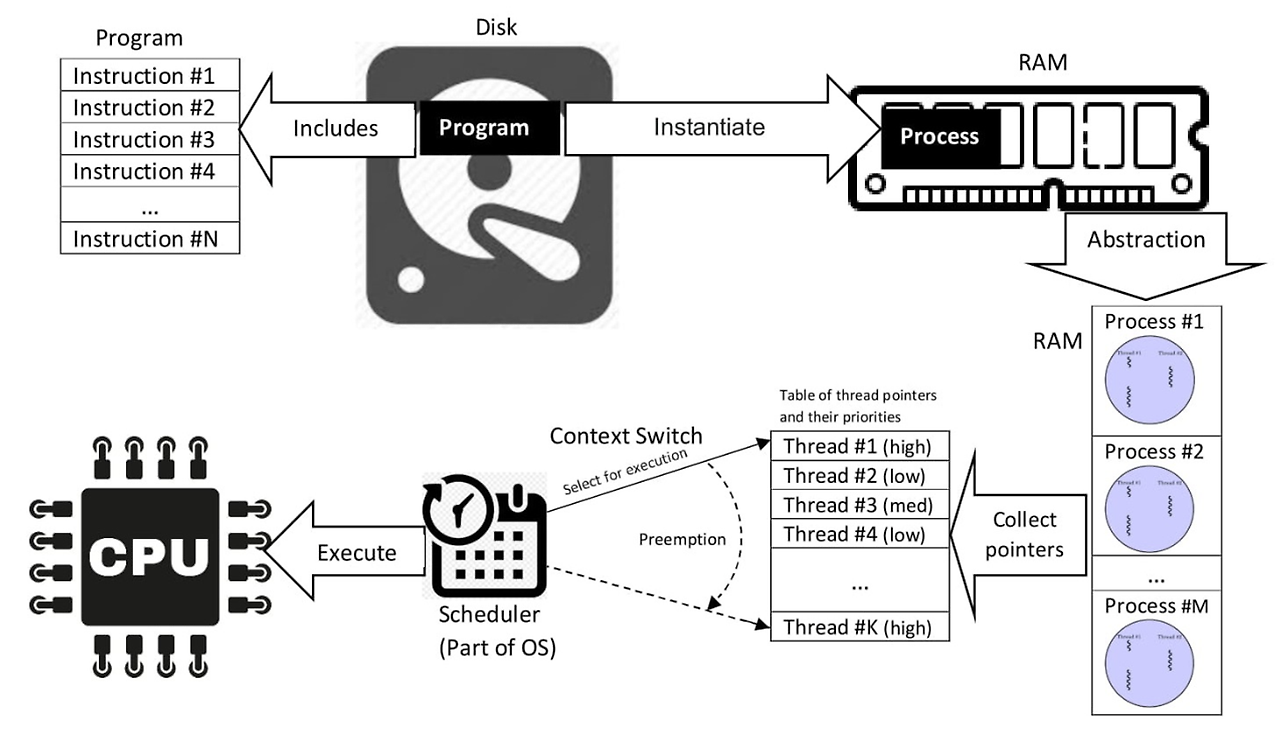
스레드는 프로세스 내에서 실제로 작업을 수행하는 단위다. 모든 자바 프로그램은 메인 스레드에서 시작되며, 사용자는 추가적인 스레드를 생성할 수 있다. 각 스레드는 독립적으로 실행되며, 자신만의 호출 스택을 가진다.(각 쓰레드의 스택 영역은 서로 격리되어 있다.) 프로세스 내의 모든 스레드는 같은 Heap 메모리 공간과 다른 자원을 공유할 수 있다.
- process : 저장되어 있는 프로그램이 실행되면 OS로 부터 메모리를 할당받아 프로세스 상태가 된다.
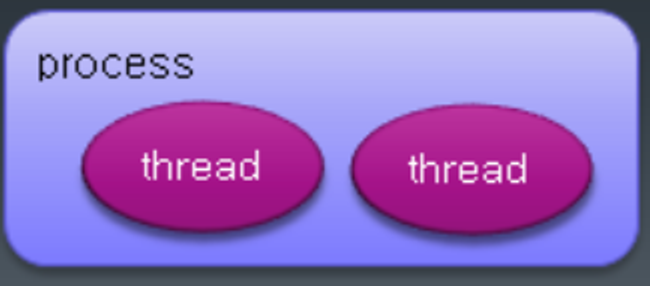
- 하나의 프로세스는 하나 이상의 thread를 가지게 되고, 실제 작업을 수행하는 단위는 thread이다.
Thread 응용
1. Thread 클래스 상속하기
예시
package useful.ch05;

/**
 * 쓰레드를 추가하는 방법 - 상속을 활용할 수 있다.
 * Thread --> Runnable --> run()
 */
public class MyThread extends Thread  {

	// 우리가 정의한 클래스에서 run() 메서드 재정의 할 수 있다.
	// 쓰레드를 사용할 때 알아야 하는 필수 개념 - 그냥 외우자!
	// 쓰레드가 가지고 있는 메서드 start() 호출 시키면 약속으로
	// run() 메서드 호출 되어 동작하게 만들어져 있다.
	@Override
	public void run() {
		// 우리가 동작 시키고자 하는 일을 정의해서 코드를 설계할 수 있다.
		// 임무 -> 반복문 200을 수행해!
		for (int i = 0; i < 200; i++) {
			System.out.println(i + ", ");

			try {
				Thread.sleep(500);
			} catch (InterruptedException e) {
				e.printStackTrace();
			}

		}
	}


} // end of class
package useful.ch05;
public class MyThreadMainTest {
// 기본적으로 메인 작업자 하나를 가지고 있다. 메인 쓰레드라 한다.
public static void main(String[] args) {
System.out.println(Thread.currentThread());
// 필요하다면 추가 작업자를 사용할 수 있다.
MyThread th1 = new MyThread();
th1.start(); // start 호출되면 run() 메서드가 동작되게 약속 되어 있다.
System.out.println("----------------------");
// 필요하다면 추가 작업자를 더 만들 수 있다.
MyThread th2 = new MyThread();
th2.start();
} // end of main
} // end of classpackage useful.ch05;
// HOW , WHY
public class Worker extends Thread {
private String name;
public Worker(String name) {
this.name = name;
}
// 약속된 부분 --> run() 메서드를 정의 하면 된다.
@Override
public void run() {
for (int i = 0; i < 50; i++) {
System.out.println("worker : " + name + " : " + i);
try {
Thread.sleep(200);
} catch (InterruptedException e) {
e.printStackTrace();
}
}
}
}package useful.ch05;
public class WorkerMainTest {
// 메인 작업자
public static void main(String[] args) {
System.out.println("---------- main 쓰레드 시작 -------------");
System.out.println(Thread.currentThread());
// 작업자 하나 만들어 내기
Worker worker1 = new Worker("워커1"); // 생성은 메인 쓰레드가 했다.
// 명령어를 통해서 워커1에게 너가 위임 받은 일을 시작해
worker1.start(); // 메인 쓰레가 명령 내림
System.out.println("------- main 쓰레드 종료 ------------ ");
}
}
2. Runnable 인터페이스 구현
package useful.ch05;

/**
 * 쓰레드를 만드는 두번째 방법 Runnable 인터페이스를
 * 활용하는 방법
 */
public class MyThread2 implements Runnable {

	// Thread 클래스에서 start 메서드가 호출 되면
	// 동작하는 부분이라고 약속 되어 있다.
	@Override
	public void run() {
		int i = 0;
		while(i < 10) {
			System.out.println("i : " + i);
			i++;
			try {
				Thread.sleep(1000);
			} catch (InterruptedException e) {
				e.printStackTrace();
			}
		}
	}

}
package useful.ch05;

public class MyThread2MainTest {

	// 메인 작업자
	public static void main(String[] args) {

		System.out.println("main start ");

		// 문제 MyThread2 를 메모리에 올리고
		// 그 안에 정의된 run() 메서드를 호출 하시오
		// 힌트 ---> Thread 문서를 반드시 확인 하시오.
		MyThread2 myThread2 = new MyThread2();
		// myThread2.run(); 일반 메서드 호출 임 !!

		// 새로운 작업자를 생성해서 위임 시킬때는 Thread 안에 있는 start() 메서드를 호출해야 된다.
		Thread thread1 = new Thread(myThread2);

		thread1.start();
		// 결국 다른작업자에게 일을 위임하려면 쓰레드에 star() 를 호출 해야 해!!!

		System.out.println("---   end main thread  -----  ");


	} //

}
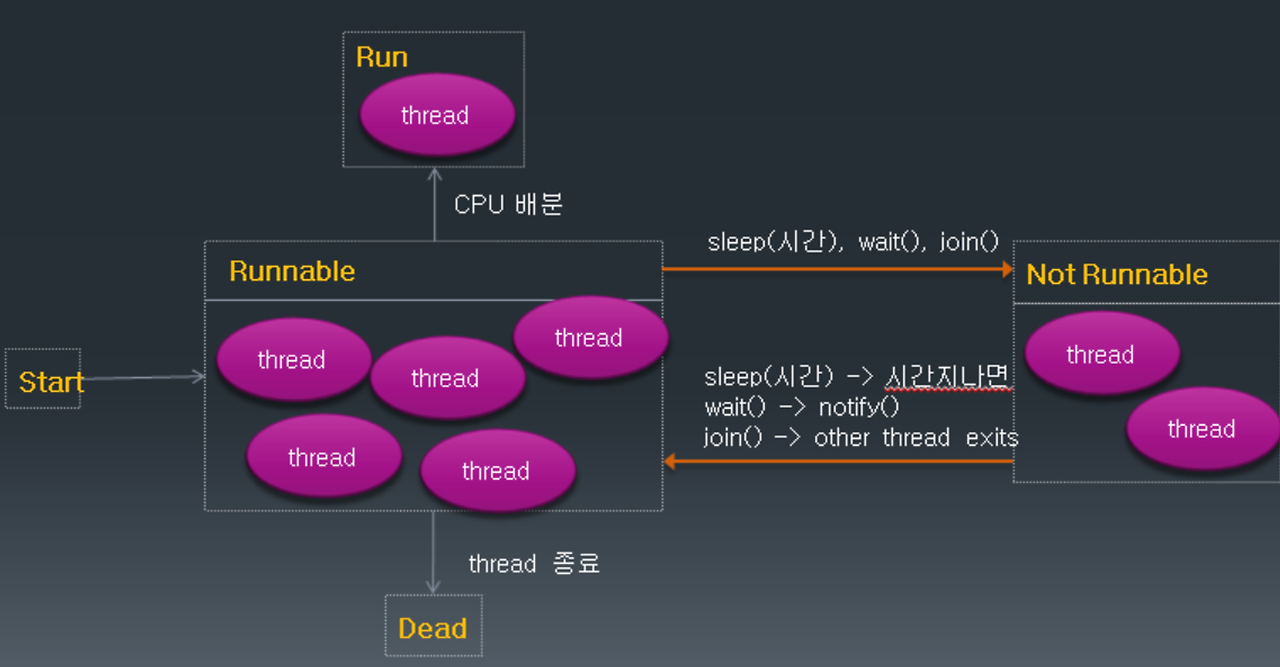
Thread Status
스레드 상태
Thread - wait & notify
(프로듀서-컨슈머패턴)
package useful.ch06;

import java.util.ArrayList;

public class WaitNotifyExample {

	// 객체들간에 공유하는 데이터(자원)을 설계
	// static 이기 때문에 인스턴스들이 자원을 공유할 수 있다.
	private static ArrayList<Integer> sharedResource = new ArrayList<>();
	private static boolean isDataAvailable = false;

	// 정적 내부클래스 활용 - 생산자 만들어 보기
	static class Producer extends Thread {

		@Override
		public void run() {

			synchronized (sharedResource) {
				System.out.println("생산자는 data 생성 시작 ~ ");
				for (int i = 0; i < 10; i++) {
					sharedResource.add(i + 1);

					// 시각적 인지를 위해서 임의 코드 추가
					System.out.print(".");
					try {
						Thread.sleep(1000);
					} catch (InterruptedException e) {
						e.printStackTrace();
					}
				}
				System.out.println();
				// 작업이 다 끝나면 상태 변경 처리
				isDataAvailable = true;
				// sharedResource 쓸수 있도록 다른 작업자들에게 알려 주기 notify
				sharedResource.notify();

			} // 동기화 블록
		}
	}

	// 소비자 만들어 보기
	static class Consumer extends Thread {
		@Override
		public void run() {

			synchronized (sharedResource) {
				// 처음 시작이 false
				// false -> ! -> true -> 반복 수행이 됨
				while(!isDataAvailable) {
					System.out.println("고객은 데이터 생성까지 기다려 ... ");
					try {
						sharedResource.wait(); // 대기 상태
					} catch (InterruptedException e) {
						e.printStackTrace();
					}
				}

				// isDataAvailable <-- 생산자가 변수를 변경해 줌
				System.out.println("데이터가 생성 완료 되어서 사용 가능 함 ");
				System.out.println(sharedResource);

			} // 동기화 블록
		}
	}

	// 테스트 코드
	public static void main(String[] args) {

		Consumer consumer = new Consumer();
		Producer producer = new Producer();

		// 소비자 스레드 시작
		consumer.start(); // 소비자는 --> run() --> 동기화 블럭 --> wait(스레드 대기)

		try {
			Thread.sleep(100);
		} catch (InterruptedException e) {
			e.printStackTrace();
		}

		producer.start(); // 생산자가 스레드 시작
		// run() --> for (10번) -> list add () --> notify() 알려주고 있다.

		// 실행에 흐름을 잘 확인 --> 프로듀서-컨슈머 패턴


	} // end of main

}
'Java' 카테고리의 다른 글
| 자료구조 (Data Structure) (1) | 2024.05.02 |
|---|---|
| Multi-Threading (0) | 2024.05.02 |
| Swing4 (Event Listener , Key Listener) (0) | 2024.04.30 |
| Swing - 3 (0) | 2024.04.29 |
| Exception (예외처리) (0) | 2024.04.29 |
'Java' Related Articles
more


